Monday, December 24, 2012

Our Christmas Eve Tradition: Rosettes

Growing up, many of my classmates had a Christmas tradition of assembling a gingerbread house.  The parents would add the icing, while the kids placed the candies along rooftops and windowsills.  They never turned out perfect like in magazines, but would be proudly displayed on the dining room table the week leading up to Christmas.

Honestly, I never understood the appeal.  So, last year Chris and I purchased one to see if I was really missing out on a magical memory.


It turned out cute, and we 'proudly' displayed it on the table during Christmas dinner, but it wasn't nearly as magical as I thought it would be.  Maybe if you make the gingerbread yourself, and the house smells like warm spices while you're assembling, then it's a completely different experience.

My family's version of assembling the gingerbread house, was the night each year we'd make rosettes.  Sometimes we'd make them earlier in December for an event or party, but usually they were made on Christmas Eve - so they'd be fresh for Santa.

photo from Scandinavianfood.about.com

The evening would start with the great hunt for the rosette irons.  Since they're only used once a year, they're usually pushed back into the far reaches of the lowest cabinet, or the highest shelf of the pantry. My mom has a selection of irons that has grown over the years - stars, trees, snowflakes, traditional rosette flower shapes, and even an elephant and clown which I'm pretty sure we've never actually used.

photo from Amazon.com

Once the irons have been located, then we made the batter (recipe below) and let it sit in the fridge for a few hours until all the bubbles have risen to the top and popped.  This makes the rosettes crispier and is worth it - a soggy rosette is gross.  I've gone so far as to make the batter the night before.

The downside of rosettes is that you use a LOT of oil.  These are deep fried 'cookies' and you'll need 2-3 inches of oil in the bottom of your pan.  You'll also want to use a candy thermometer to make sure that you don't overheat your oil and ruin the whole batch.  You'll also need a lot of paper towels and plenty of counter space for the cookies to drain on.  Once they're dry and cooled, you can sprinkle them with a little powdered sugar, or if you're taking them to an event, wait until right before serving them to add the sugar.  

Since we'll be making these on Christmas eve as Santa's cookies, I'll make the batter in the morning, frying the cookies in the afternoon before the candlelight church service, and then put the leftovers in cookie tins for Chris to bring to work.  (The cookies are very fragile, so hard sided containers are better for storage instead of air tight ziplock bags.)

Recipe:
  • 2 large eggs
  • 2 tsp. white sugar 
  • 1 tsp. favorite flavored extract
  • 1 cup milk
  • 1 cup flour
  • 1/4 tsp. salt
  • Canola oil for frying

  • Firmly whisk together the eggs, sugar, extract (if using), and milk. 
  • Sift together the flour and salt. 
  • Whisk into the liquid until the batter is the texture of heavy cream. 
  • Refrigerate for at least two hours. 
  • Heat 2" to 3" of canola oil in a deep fryer or in a large, heavy frying pan over medium-high heat to between 360º and 365º. 
  • Once the oil has reached heat, submerge the rosette iron into the oil to quickly heat it. 
  • Pour your batter into a shallow square pan or container. 
  • Carefully dip the heated rosette iron into the batter so that the batter covers the bottoms and sides or the iron but does not cover the tops. 
  • Dip the batter-covered rosette iron into the pot, completely submerging it in the oil. 
  • Allow the rosettes to fry until golden brown, using a knife edge to scrape off any excess batter formed at the top. 
  • While browning, your rosettes may voluntarily fall off of the iron into the oil. If so, simply fry them on each side for a few seconds until brown, then remove from pan with tongs or a chopstick. 
  • If your rosettes have stuck to the iron while browning, use the knife to gently pry them away from the iron on to paper towels. Invert and cool. 
  • After the cookies have cooled, you can either store them in an airtight container or freeze them for later use. 
  • Immediately before serving, sprinkle with powdered sugar. 
  • Yields  3-4 dozen Scandinavian rosette cookies
Making rosettes with toddlers:
The batter is very straight forward, and toddlers make great whiskers, so if you'd like to make these with your toddlers and young children, this would be the best step to involve them in.  During the actual frying of the rosettes, toddlers should not be in the kitchen.  (I'm making mine during nap time).  The cookies on the counter are tempting but very hot, and deep frying and toddlers is a horrible combination.  Sprinkling the finished cookies with powdered sugar is a fun job for children, and if they're gentle enough, counting out a dozen and carefully placing them in the cookie tins is the perfect job for mommy's helper.

I'll update this post with pictures of my finished rosettes later tonight.

Friday, December 21, 2012

Sticky Situations Contest - Win an iPad mini!

As the mom to a toddler, I know how quickly life can go from clean, tidy and completely under control to a chaotic hot mess.  It's usually about the same length of time it takes me to use the bathroom with the door closed or clean out the dishwasher with my back turned.  Every mom has her own way of handling the sticky situations that come with parenting children.  Mine is the rule of 15:  If it takes less than 15 minutes to clean or costs less than $15 to fix, then it's not worth getting stressed out about and we just turn it into a learning opportunity for Hannah.  This rule helps us keep things in perspective.


WetOnes is giving us the opportunity to share  the Sticky Situations we have found ourselves in and tips on how to deal with them through their Facebook Contest!
Simply log on and share your story and tips, and you can be entered to win an iPad Mini or Six Flags Tickets

 
or
 

I just entered, it doesn’t take long at all, here’s the link to enter: https://www.facebook.com/momcentral/app_248884015238315

I participated in a campaign on behalf of Mom Central Consulting for Wet Ones. 
I received a promotional item to thank me for participating.

Thursday, December 13, 2012

Nativity Sets for Toddlers

For as long as I could remember, my favorite part of preparing for Christmas wasn't putting up the tree, but setting up my mother's elaborate nativity set.  Each year we would try to find a new figurine to add to it, and now as I unbox them I can recall the stores we purchased them it, the look on my mom's face as she unwrapped it, and the placement it's been given over time within the set.  Now that I host Christmas for the family, my mother has passed down the set to me, and it's my most treasured decoration of the season.

Because Hannah is at an age where every decoration is up for grabs, I'm only unpacking a small portion of the nativity set, but this is an example picture of the style of my Fontanini set.


Hannah was very interested in the figurines, and I used it as an opportunity to again explain the meaning behind Christmas.  While the figurines aren't easily breakable, I have been discouraging Hannah from playing with them. 

It's a little too late to get Hannah her own nativity set for this Christmas, but I'd like to get her one next year when she's three.  Her brother will be about 9 months old so it needs to be baby and toddler friendly.  Here are a few I've found so far:


At about $25, this set is reasonably priced.  We own a few Little People sets and they are perfect for babies and toddlers alike - they're not breakable, light weight, and fit easily in tiny hands.  This set is also high in cute factor, and plays Away in a Manger if you add 3 AAA batteries to the stable.


This price runs under $30, but I'm not familiar with the brand or the quality of their products.  I do like that there is a stable, multiple animals and angels included.  I also like that the figurines are more realistic than the Little People set.


With a list price of $45, this set is probably not going to be the one I select.  I like that the figurines are posable with movable arms, but I wish it included the three wise men.


Coming in at under $30, this set is at a good price point, and everyone knows I love my Melissa & Doug toys.  The wooden blocks are durable, I'm just not sure they're as enticing as the other sets.  I WANT Hannah to play with her nativity set.  I want it to be a toy that inspires conversations and storytelling.  While my set is meant to be enjoyed visually, I want Hannah to be excited to play with hers.


Although it's a little 'babyish', I have to admit that I'm leaning towards the Little People set.  I trust the quality, I like all the animals included, and I know Hannah will respond positively to it.  

That said, I have a year to make up my mind and I'd love some reader feedback.  Do you own any of these sets - or perhaps a different one I didn't find during my search?  Reviews, both positive and negative, are welcome.  


Friday, December 7, 2012

Orange Zested Cookies with Sweet Orange Glaze

I'll be 27 weeks pregnant in a few days, and so far the only cravings I've had are for clementine oranges and green apples.  I blame the clementines craving partly on Hannah.  She brings me 4 of them, "two for mommy and two for Hannie!", bribing me for that I'll peel them for her.
It works every. single. time.

So the other night, when I was on Pinterest and saw a recipe for Orange Zested Cookies with Sweet Orange Glaze, I was a goner. I had all the ingredients on hand, so it was just a matter of time.


Shopping List:
- all purpose flour
- baking powder
- salt
- 2 sticks of butter
- granulated sugar
- confectioners’ sugar
- 3 oranges for zest and juice
- 1 egg

I followed the recipe from Stephanie's Kitchen to a tee, and these cookies turned out beautifully. The recipe started out like most cookie recipes: The dry ingredients were sifted together in a medium bowl, and the room temperature butter was put in the mixer to cream. But then the recipe took a fabulous twist. The orange zest was added to the granulated sugar, and I mixed them with my fingertips.


The essential oils in the zest turn regular white sugar into this light, fluffy, orange tinted sugar that smells amazing.


Once you add it to the butter to cream, you add some orange juice and an egg and finish creaming together. I scrapped down the side of the mixing bowl and then slowly added the dry ingredients (flour, salt, and baking soda) with the mixer on low until a sugar cookie consistency dough is formed. The dough is dotted with the orange zest and is slightly drier than a chocolate chip cookie dough.

The oven was preheated to 350*, and my cookie sheets were lined with parchment paper. You're only going to cook these until the bottom is slightly golden, so the parchment paper helps to get these cookies off the sheet quickly and prevents browning.

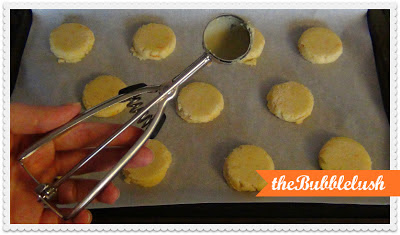
I use a small ice cream scoop so that the cookies are a consistent size.


Since the dough was a drier style, I figured they wouldn't spread out very far. I used a flat bottomed glass bowl dipped in a small bowl of granulated sugar to flatten each ball to a consistent diameter. After baking I noted that the cookies didn't flatten much more, so smush to your desired size. The sugar just keeps the glass bowl from sticking to the dough.


Each batch was baked for 10 minutes and the bottom was perfectly golden, but it might take up to 12 minutes depending on your oven. Don't overbake or they will be too dry.

Once the cookies were baked and cooled on racks, I mixed up the glaze. I added the remaining orange zest to some powdered confectioner's sugar and thinned with orange juice until runny, but not watery. I tried to spoon the glaze over the cookies, but I found that I got better coverage if I just dipped each cookie's top into the bowl of glaze and tapped off any extra.


Make sure you put the used parchment paper under the cooling racks to catch all the dripping glaze and make clean up easier.


I let the glaze set up for an hour while Hannah napped, and the recipe made about 3 dozen cookies.  I reserved 6 for Hannah and I to eat as a snack (Chris HATES citrus desserts) and boxed up the rest to bring to my husband's coworkers. They lasted 15 minutes, and got rave reviews. Not only are these cookies delicious with a bright citrus flavor, but they look beautiful with the zested glaze.  This recipe has made the cut and been added to my recipe book.


For the complete recipe, click here.

ShareThis

LinkWithin

Related Posts Plugin for WordPress, Blogger...